
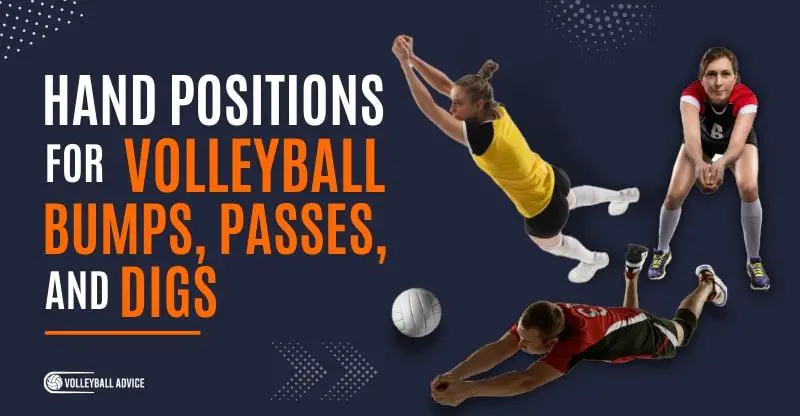
Hand Position For Volleyball Bumps, Passes, and Digs (6 Rules)
A good pass is needed to play volleyball well, and a good pass begins with proper hand positions. Doing so will not only make passing more comfortable, but also increase your accuracy and effectiveness.
So, what is the proper hand position for volleyball bumps, passes, and digs? The proper hand position for bumps, passes, and digs is with both hands palm upward, fingers stacked on top of each other, and palms rotated 45 degrees towards your body. The thumbs should be folded over the stacked fingers, joining at the first knuckle and the ball of the thumb, creating a flat platform for passing.
Not having a proper hand position for passing, such as using the “clasped” hand position where one interlocks their fingers or the “ball” position where one hand is wrapped around a fist, creates an uneven surface that will bounce the ball unpredictably off target. Using these hand positions at high levels can even lead to jammed fingers.
In this article, I’ll be discussing:
- The proper hand positions for passing and what they look like
- Differences between overhead and platform passing
- A list of common mistakes and how to fix them
What Is The Proper Hand Position For Bumps, Passes, and Digs?
The proper hand position for bumps, passes, and digs is very flat and looks like you’re squeezing your fingers, knuckles, and thumbs towards the center, fanning the platform out into a wide “v” shape. This not only creates a wider platform to pass from, but also is more easily released than other incorrect forms, allowing players to catch themselves when diving safely.
When done correctly, this hand position will encourage the formation of a solid arm placement also, with forearms together, elbows angled downwards, and shoulders shrugged forward. This is due to joint mentality: a theory that aligning bones in certain ways will dictate complementary actions to the body. Essentially, do the first thing properly and the rest will follow.
This hand position should feel comfortable and natural to form, though understanding how to stack your fingers can take some getting used to for new players.
How to Make the Platform
Step 1
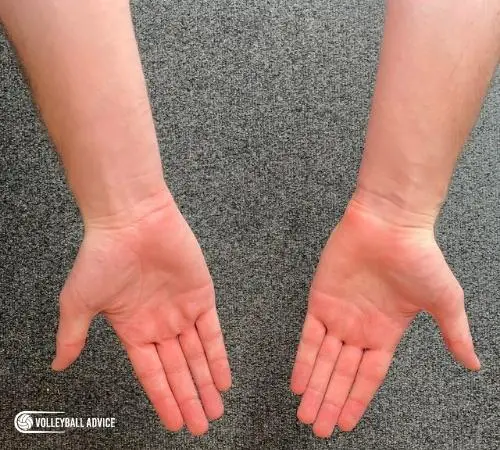
Begin with both hands extended in front of you, palms facing upwards
Step 2
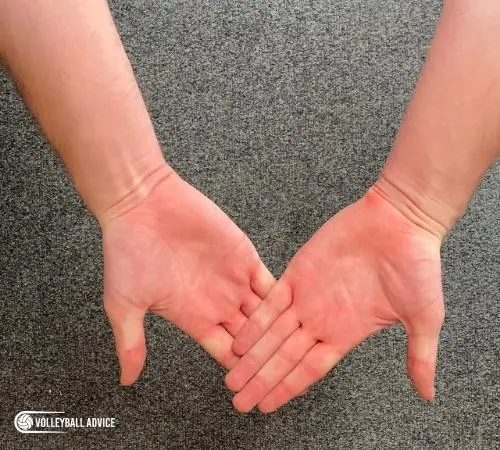
With straightened hands, stack your fingers (not palms) on top of each other. I like to stack my left hand above my right.
Step 3
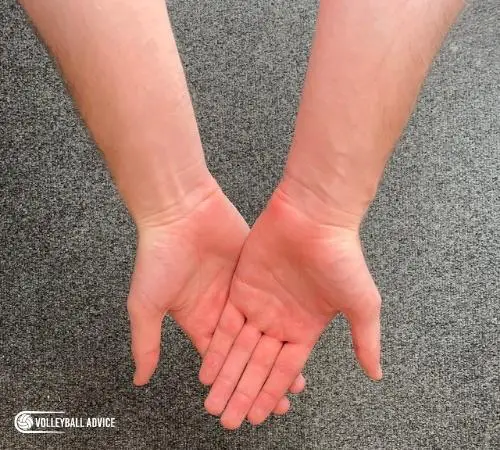
Keeping your fingers in place, swivel your palms 45 degrees towards your body. This should form a sort of arrow pointing ahead, and a right angle from the intersection of your palms. Try to keep your fingers neatly stacked in-line with each other.
Step 4
Fold your thumbs over your fingers, lining the tips of your thumbs with the tips of your fingers. Your thumbs should touch along the first knuckle joint and the ball of the thumb.
Step 5
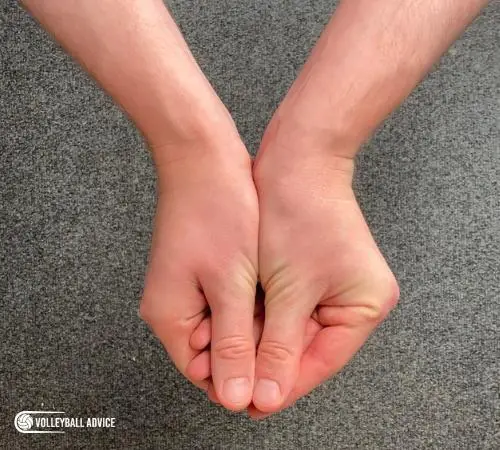
Adjust the platform to your liking, and squeeze your thumbs and fingers together to create a flat platform.
Step 6
Bump/Pass/Dig!
Overhand Passing (“Tomahawk”)
For overhead passes, the hand placement is slightly different. As this is primarily used in beach volleyball, you will almost never see it used in indoor volleyball if it can be avoided, but it’s still an excellent skill to know.
Instead of stacking your fingers vertically to create a wide platform on top to pass from, the goal here is to make a wide platform on the bottom of your hands to pass from.
There are several ways to do this, and no one has the right answer. Some players like to use the “open hand” method, where they simply stand their palms and push, others use the “prayer” method and chop the ball above their head with that, and there are many other ways of doing this.
My preferred method is to just alter our platform.
- Instead of swiveling our platform 45 degrees towards our body, we’re going to stack our fingers and turn our palms until they form a line, facing each other with thumbs pointing up.
- Fold your thumbs as usual and allow your fingers to wrap around your other fingers, forming a hollow “bowl” shape.
- Raise this above your head and pass with the “karate chopper” parts of your hand, and you’re all set!
Here’s an excellent video that demonstrates how to change your normal hand position to a tomahawk one:
4 Common Hand Position Mistakes For Bumps, Passes, and Digs & How To Correct
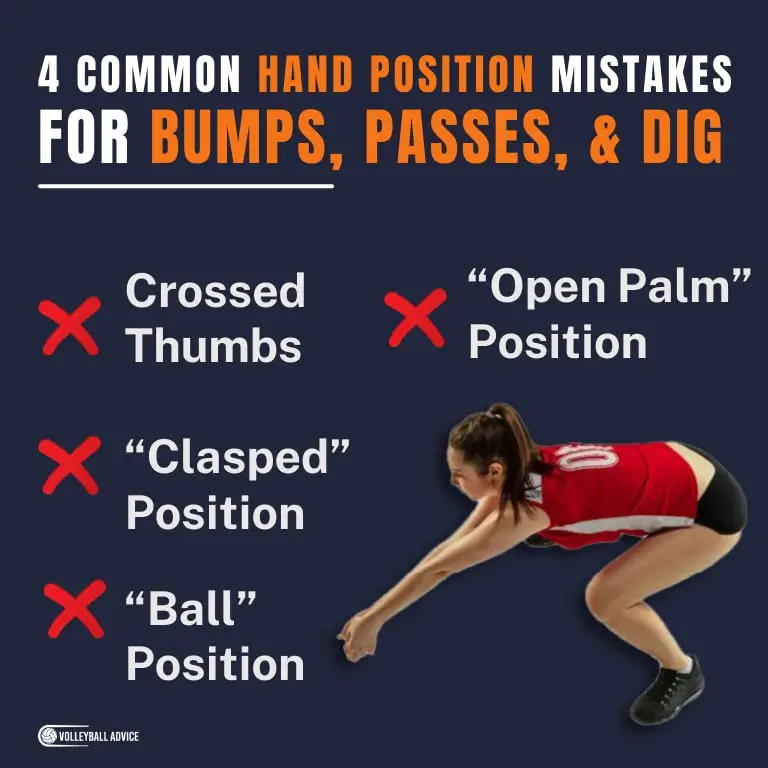
1. Crossed Thumbs
Crossing your thumbs is a common mistake and completely ruins the flat platform made through the other steps. This will cause the ball to ricochet in an unpredictable direction, detracting accuracy and effectiveness from your passing platform.
Thankfully, this is an easy fix. Simply uncross your thumbs and remember to squeeze them together or down and your platform will be top notch once more.
2. “Open Palm” Position
This position is most often done by new players or anyone who has never been taught how to play volleyball. It involves them stacking their palms together and “lifting” through the ball to pass, essentially slapping it from underneath and hurting their hand in the process.
This not only takes away much of the ball’s power when passing, but is also against the rules.
3. “Clasped” Position
This position is most often done in middle school, often taught by a well-intentioned volunteer parent who either hasn’t played for a while or not at all.
This hand position involves clasping the hands and interlocking the fingers. This is bad because interlocking the fingers instead of stacking can lead to bruising and discomfort while playing, and is the hardest hand position to release.
This last part is especially important because of its safety element: it’s difficult to catch one’s self when falling if your hands are clasped.
Additionally, this hand position is very narrow compared to the proper hand position, and makes it much harder to pass effectively. Using a wider platform will not only make playing easier, but make you a better player as well.
4. “Ball” Position
This position is another that is often taught in middle schools, and similar to the “clasped” position has a very small area from which to pass. As we want the widest platform possible to pass with, this makes the “ball” hand position undesirable.
This hand position involves wrapping one hand around the other, formed into a balled fist.
While this is easier to release than the “clasped” position, the problem here is that your hands easily slip away from one another, i.e. there’s nothing connecting them or securing the platform in place.
This can lead to shanking balls that otherwise look like easy passes, and also prompts passing close to your body.
Related Article: 7 Types of Passing In Volleyball
Hand Position Passing Drills: Level and Angle
The best way to train hand positions is through self-practice.
This involves – firstly – spending time to understand how your hands fit together and making sure you are comfortable before adding a ball into the equation.
Once that’s done, you can move on to two exercises that will help train your platform level (how flat is it) and your angle (how you direct the ball).
While each of these drills train other aspects of passing, such as arm extension and footwork, the hand position aspect of this drill is important to prevent the ball (or your arms) from moving unpredictably.
Level Drill
For this drill, you can be either sitting or standing. The focus should be on maintaining a level hand position that is completely flat, as detailed earlier in this article.
Toss the ball in the air, raise your platform, and pass the ball to yourself straight up. This can be high or low, all that matters is that it rises and falls in a line without making you take a step to retrieve it. Continue passing to yourself, and when standing still gets too easy, practice moving around.
If you find the ball bouncing strangely, it might be an indication that your hand position is failing. Establish proper form, and try again.
For advanced players, try doing this drill with a couple friends, each with your own ball. Exchange balls mid-pass with them without dropping it, and continue on. This is a great drill for the whole team that trains communication as well as hand positioning level.
Angle Drill
Similar to the level drill, this drill focuses on keeping good hand positions even when passing at an angle. For the purposes of this drill, we use a wall.
Toss the ball and pass it with proper hand position into a wall, being mindful of your footwork and arm extension at the same time. Aim to pass high and powerfully in order to give yourself more time. This will also train your impact control. Continue passing to the wall, experimenting with different angles and sides of your body from which you pass.
Once again, if you find the ball bouncing strangely, it might be an indication that your hand position is failing. Establish proper form, and try again.
For advanced players, I recommend peppering instead, though the wall has its benefits. This will add in an extra element to which you need to react, further increasing your potential.
Advanced Hand Position For Bumps, Passes, and Digs: One Handed
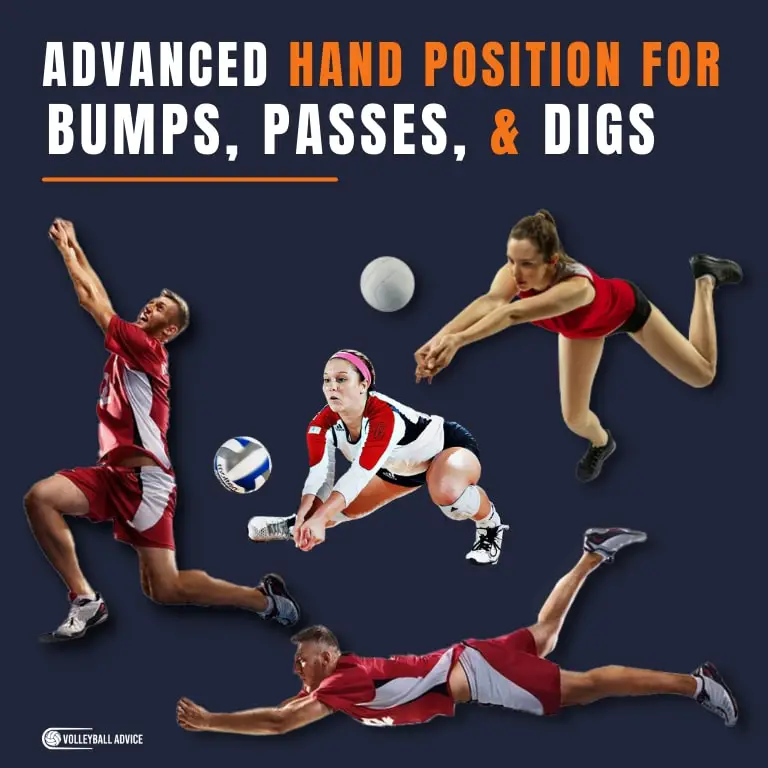
If you’ve watched a high level volleyball match before, you know how intense competition can be. With serves and spikes flying around, unpredictable ricochets, and only a moment’s touch to redirect the ball, life as a defender is one of the hardest jobs on the volleyball court.
Sometimes you can be caught off guard by a ball with only a split second to react, leading to miraculous saves or understandable shanks. One thing which often happens here is the one handed pass.
One of my coaches used to say that “if you can get one hand to the ball, you can get both”. And while this is true for a prepared, mindful defender with their weight forward, you can never predict what might happen during a match. I believe that this is enough to make one handed passes not only a desirable skill for elite athletes, but a necessary one.
There is little form or grace to passing with one hand – it essentially consists of getting your arm in the way in time. I recommend the “ball” technique for this, passing with the top of your fist and the thumb, as it has the biggest surface area and can utilize a wrist snap to redirect the ball if needed.
Others use a “claw” form, where they pass with the thumb and forefinger extended in a kind of claw. Some use the back of their hand, others use their feet whenever possible (yeah, we all know that guy), but the one thing you want to avoid is the palm.
Refs rarely call carries (or lifts, depending where you’re from), but whenever they see contact with the palm that gives them the green light to do so. Don’t lose your team points unnecessarily, especially if you could be the hero instead.
To practice one handed passes, play with a ball. Bounce it from hand to hand, seeing how much control you can exert over it and how long you can keep it going. This will improve your ball handling skills in all aspects of volleyball drastically, and I am a massive advocate for this kind of “mini drill”.
Carry a ball around for a week, and practice between class, while walking, at home, watching tv, anything. After just a week, you’ll see a big improvement, and your one handed passing will start to come naturally during games.
While I still support and insist on my players passing with two hands whenever possible, it always pays to be prepared, and having one handed passing in your repertoire will never let you down.
Hand Position For Other Volleyball Skills
- Hand Position For Setting In Volleyball (7 Steps)
- Hand Position for Spiking in Volleyball (Tips and Tricks)
- Hand Positions For Volleyball Serving (3 Types)
About The Author
Ailan Samuel is a writer and athlete who has played volleyball at the university, club, and national level since 2012. He has competed successfully in both beach and indoor competitions, resulting in four silver and two gold medals, and was awarded the Half-Blue while playing in Scotland. He received his MA in English and Medieval History from the University of St Andrews, Scotland, and is currently studying for his MA in Publishing and Creative Writing at Bournemouth University.