
The Ultimate Volleyball Drills Guide (For All Levels)
Note: Here are a couple of fantastic books that will save you hours in setting up drills and also act as a great reference to return to time and time again:
Generally, you can’t go wrong with any book by the American Volleyball Coaches Association (Avca) either.
Glossary
S – Setter or Server depending on the diagram / drill
C – Coach or Caterpillar depending on the diagram / drill
H – Hitter
F – Feeder
T – Target player or Tosser depending on the diagram / drill
B – Blocker
D- Digger
R – Receiver
P – Passer
Contents
What to Keep In Mind Before Starting
Planning
While many coaches spend a long time formulating concepts, ideas and volleyball drills that they think would improve practice sessions, not many actually sit down to fully formulate a plan so when the time comes they are prepared.
There are several things that you should do before deciding which drills you want to run, in the following order:
- Take into account yourself, as well as your coaching and support staff
- Write down what each person’s strengths and weaknesses are
For example, is there a staff member who is better than anyone else at serving, tossing and hitting? If so, make sure that they will be directly involved in the drills.
If there another staff member who has a knack for analyzing the opposition then that should be their main responsibility etc.
- Think about individual players and how they will fit into the team.
You can do this by first and foremost evaluating a few things: their skills, knowledge of the game, and strengths and weaknesses. Also take into account their physical attributes, maturity and learning styles.
- Think about how you want to communicate your ideas to your players.
For example, do you want to leave little leeway for creativity and what you say goes, or would you prefer that your players are encouraged to think for themselves?
Drill Selection
Once you have answered the questions above and fully evaluated your coaching staff and players to ensure that everyone is utilized to the best of their ability it is time to decide which drills you want to run.
It is wise to use both coach-centered and player-centered drills. What we mean by this is that in coach-centered drills, a coach is directly involved. For example, the coach gives instruction to the players, controls the pace, and initiates the ball. It is a good idea to use coach-centered drills at the beginning of the season so you have a solid foundation to start from.
Player-centered drills, on the other hand, have your players initiating the ball and controlling the pace. Your job as a coach is then to provide feedback.
While some coaches believe that each and every drill should be used in a practice session just to fill a time slot, a good coach knows better.
A good coach will analyze the needs of the team and the opposition they will face in the next game. This ensures that your team will not only be fully prepared for their next game, but will also be able to improve each practice session.
To go into more detail we will now touch upon the best types of volleyball drills to select for preseason, mid-season and postseason.
But first, remember that regardless of the phase of the season each practice should always begin with a warm-up, run through several drills, and then end with a competitive game, followed by a rewarding, satisfying ending so the players feel that they have gained a lot from practice while being eager for the next practice session.
Preseason
After the season finishes and before preseason begins, your players likely won’t have played volleyball in any serious way, let alone picked up a ball. Therefore, it is vital that players are fully involved by running through each drill many times to get their skills up to scratch.
In fact, it is the preseason where your players should touch the ball more than during any other time in practice during the season.
It’s also important to keep in mind that a competitive environment should still be fostered, even if it is just the preseason. This ensures that your players are fired up early and will be in the right frame of mind when the first game of the season arrives.
A good way to kill two birds with one stone is to play doubles, triples, and quads. This is because, as mentioned, players need more touches of a ball and more repetition at this phase in the season, and playing 2v2, 3v3 and 4v4 ensures that each player gets many more touches than they would if playing 6v6.
You’ll also want to make sure that your players have all the right equipment like suitable volleyball shoes.
Mid-season
Hopefully by the time mid-season comes around your players’ skills are properly honed. Therefore, this is the time to focus more on multiplayer, team, defense, transition, and offense volleyball drills. You should, of course, not completely disregard skill repetition, but will find that it isn’t needed as much as it was in preseason.
Think of the main goal of mid-season as to fully prepare your players for upcoming matches, place an emphasis on team play, and foster a game-like competitive quality in drills.
A good way to achieve this is to play short scoring games, as it provides many opportunities for players to experience victory. This will ensure that your players will not only foster the desire to win, but also be comfortable in situations where they are closing in on victory.
Postseason
Typically not much time is provided for postseason practices. Therefore, each session must be set up for maximum efficiency. This is the time where each practice session must be used to prepare specifically for each opponent.
Due to this, drill selection should be precise with each drill specifically emphasizing what the team is likely to face in the next game – much more than in the mid-season. Matchups should also, therefore, be setup as closely as possible to mimic what your team will face in the next game.
Further Reading:
Repetition
While many coaches are tempted in running through just a handful of drills each season, this is the wrong attitude to bring to practice. It is a better idea to run through a program where drills are constantly changing throughout the season.
This is to ensure that players don’t get bored during practice, and by running through new drills you will notice that the enthusiasm of your players increases.
You may be wondering when a drill should be stopped?
Well, a good general rule to follow is that if you sense that players and coaches are becoming tired of a drill, stop it immediately. Stopping a drill even before others are becoming tired of it is ideal, although this may be harder to do in reality.
The last thing to mention is that it is more beneficial if there are many repetitions in a short time, rather than a few repetitions over a long time.
This is because if players are waiting a long time for their turn to run through the drill they get bored easily and your feedback also loses its effectiveness due to the time spent waiting.
How to Make the Most Out of Each Practice
Even if you have evaluated your team and know which volleyball drills you want to run, that is not enough to get the most out of each practice session. There are a few others things that should be taken into account so you are fully prepared from the moment practice begins to fully utilize the time spent practicing.
It is advisable to ask yourself the following questions before practice:
- Which players will be in which team or group?
- Who will substitute, as well as where and when?
- Will you be speeding up or slowing down at certain points depending on time – i.e. you push players harder nearing the end of practice – or in certain situations?
- Will there be any reward for the players if they perform well in practice, just for the winning team, or none at all?
Your players also need to be able to look up to you and have faith in your coaching ability. Depending on whether just you yourself take the practice sessions or you have other staff members contributing, it is wise that you and/or your staff are at the very least capable at serving, hitting and tossing, particularly if you or your staff members are directly involved in running the drills.
It is also paramount that you give feedback, both positive and constructive, during and after each drill so your players know exactly what it is they are doing right and wrong, and how to remedy it to become better players.
Further Reading:
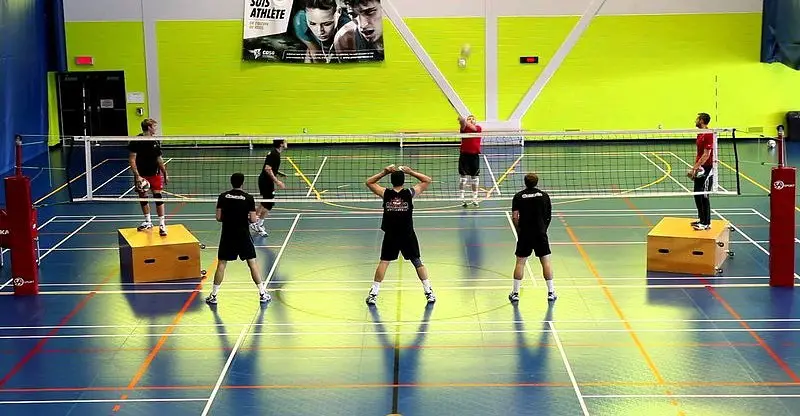
SERVING DRILLS
You may currently think of serving as simply the way to start off the play, but it can and should be so much more than that.
A solid serve can not only win you the point straight away, but it can also serve as a way (pun intended) to disrupt the opposition’s offense by making it much more challenging for the passers to handle and making it more likely that you will win the point.
While the first concern of every serve should be to get the ball in play, you also don’t want to make it easy for the opposition to handle.
Every serve features the following three steps:
- The presentation
- The toss
- The follow-through
When running serving drills, technique should be checked before, during, and after the play and then the server should be given feedback.
As mentioned, a serve should always find its way in the court, but a good way to ensure that a serve is also in play and aggressive, making it harder to return, is to use a grading system to encourage and remind your players that they are doing what you are looking for.
- A: A mediocre serve that is almost always in play
- B: A serve that is more aggressive but also made sure to be in play the majority of the time
- C: A serve that is even more aggressive than B, and one that your server really goes for with freedom of getting it wrong
Over time you want a server to reach Level C in aggression but with the accuracy of Level A, although this isn’t always necessary depending on the game situation.
Look at the following serving drills below and try to incorporate what we just stated above if applicable to the drill.
Beginners
Volleyball Serve Relay Drill

a. PURPOSE
While serving is the only time in which the player is in full control of the ball, with a chance to take a breath, this drill has players serving while under “game like” pressure.
b. SET UP
- Divide your team into 2 even groups
- One volleyball per group
c. RUN THE DRILL
- The first player from each team serves the ball, then goes to retrieve it and gives it to the next person in line
- If the player misses their serve, they must retrieve and serve again until a successful serve is made
- Each group continues until everyone on the team has served successfully
- First group to finish is the winner
d. COACHING POINTS
- Watch for correct serving form
- Encourage the players not to rush their serve
- Focus on accuracy and placing the ball strategically
e. VARIATIONS
- Call out to one specified zone, or have one specific zone for each group
- Play “around the clock”: each member progresses clockwise through the zones from 1, to 6, to 5, to 4 and so on
- Have the group start completely over if a member misses a serve
The Caterpillar Drill

a. PURPOSE
This is another accuracy drill, with a twist: serving at a target made up of moving players, allowing for each server to have to pinpoint serves differently each time they serve.
b. SET UP
- Have two groups of three players link arms to form a “caterpillar” and set up on one side of the court between the attack line and the end line, with each caterpillar at one of the sidelines
- Servers line up behind the end line in two lines, one at each corner, on the opposite side of the net
c. RUN THE DRILL
- Each caterpillar moves sideways across the court. When it touches a sideline, it reverses direction and moves toward the other sideline
- Each player in the serving line gets three turns to serve. The first player in the serving line serves, attempting to hit a caterpillar, then returns to the end of the serving line. If the server hits the caterpillar, that serve scores 1 point
- If the server does not hit the caterpillar, no point is scored and the server must retrieve the ball
- The first player to score 3 points wins the round. Servers and caterpillars then switch roles for the next round
d. COACHING POINTS
- Have the caterpillar line take a step up or back each time the line reaches the sideline
- Have the players in the caterpillar use their hands to keep the ball from hitting them directly
e. VARIATIONS
- Have the caterpillar line stay deep or stay short
- Add more players to the caterpillar to start the drill
- The caterpillar can also move front to back, or diagonally – have fun mixing it up
- Have the servers find the spaces between the two lines of caterpillars to score a point
Intermediate/Advanced
“H.O.R.S.E.” Drill

a. PURPOSE
The game of “H.O.R.S.E.” is often associated with basketball, in which two players compete against each other to mimic how a basket is scored. In the volleyball serve scenario, the 2 players try to mimic each other with zone service accuracy.
b. SET UP
- Have your players get a partner (example, 12 players get into six pairs)
- Arrange the pairs equally such that half of the pairs are on one side of the court at the service line, while the other half are on the other side also at the serving line (from the above example, 3 pairs on one side of the court and three pairs on the other side)
- 2 volleyballs for each side of the court
c. RUN THE DRILL
- One member of the pair serves the ball to a zone of their choice in the opposite court.
- The other member of each pair competes to mimic the serve placement (i.e. if the first player serves the ball into zone 5, the second player of the pair must also serve the ball into zone 5)
- If the second player does not replicate the serve accurately, he/she is assigned an “H”
- The pair then rotates to the back of the line of pairs and the next pair moves up to serve
- When each pair gets back to the front of the line to serve, the winner of the last round serves again. If the other player mimics the serve placement, it is a “tie” and no letter is assigned; as such, the second player goes first the next time (leaving the first server from the tie to mimic the serve on the next round)
- If the other player of the pair misses again, he/she is assigned an “O”, and so on
- The balls are gathered by the waiting players on either side, and then given to the front pair
- The player who gets the full “H.O.R.S.E.” is out
d. COACHING POINTS
- Accuracy is the main focus of this drill, but speed can be built in to simulate a game situation
- The coach can blow a whistle to signal when the player has to serve
- Encourage the players to serve both to the backcourt as well as the frontcourt
e. VARIATIONS
- Create an elimination “tournament” – from the above example, from 12 to 6 players, then 6 to 3 players. The three players can be the final group, with the letters being assigned accordingly
- Build some team spirit with the name – your team nickname, the coach’s name, and so on
- Have the coach call out the zones, or put a pylon in each zone in order to have the players hit the pylon with their serve (and the second player has to hit the pylon as well)
SETTING DRILLS
When it comes to setting volleyball drills there are two vital aspects to work on. One is to ensure that the set is accurate, regardless of the setter’s position on the court; and the other is to get to the ball, otherwise no set can take place and the point will be lost.
The following drills will deal with improving these key aspects, but it is also important to approach the drills in the right way.
- Talk to the setter independently and let the player know what your expectations are.
- Encourage the setter to give their own input
- Run setting drills at a quick pace. This ensures that the setter gets into the habit of functioning at a quick pace during matches
- Communicate concisely for efficient practices. For example, “Tight” is communicated when the set is too close to the net. “Deep” when the set is past the intended attacker. “High” when the set is too high etc.
Beginners
Line Setting Drill
a. PURPOSE
This beginner setting drill will focus on the setter squaring their bodies up to their target. This is a great small group drill for beginners to work on setting with a partner.
b. SET UP
- Have two players face each other approximately 10 feet apart
- Each player should straddle a line facing each other
c. RUN THE DRILL
- Player 1 tosses a ball to the second player, who sets the ball back to player 1
- Repeat this for 10 sets and switch the players’ roles
- Players should remain straddling the line to force them to face each other and square their body up to the target.
d. COACHING POINTS
- Remember good form: square up to the target, squat under the ball
- Bring up the hands, fingers pointed out and spread out, cock the wrist back above forehead
- Extend the arms up through the ball using the legs and arms at the same time
e. VARIATIONS
- As the players have more success setting, have them set the ball back and forth
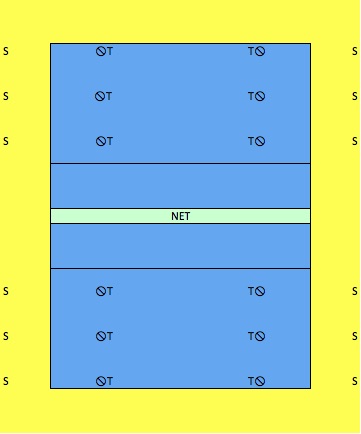
Three Target Setting Drill
a. PURPOSE
Players try to set as many successful balls as they can in each round, with the ultimate goal of performing 100 to 1,000 sets for the practice, as ability allows. The goal is to improve accuracy of sets through repetition.
b. SET UP
- Coach and feeder in back court
- Setters in free zone at net, and target players in the hitter position set up on one side of the net
- Another setter or two can line up on the sideline, ready to replace the setter
- The coach gives the setter the designated sets before initiating play (i.e. zones 2, 3, or 4)
c. RUN THE DRILL
- The coach tosses the ball to the setter at a consistent height for each series
- The setter sets the assigned set to the target in the hitter position
- Target in hitter position catches ball, tosses back to feeder
- Players repeat the sequence with the same setter for at least 5 sets; 10 are best. It is better for setters to perform more repetitions in a short time than to perform only a few repetitions and then wait for another turn
- The next setter in line steps up to take a turn without breaking the rhythm; the transition is quick
d. COACHING POINTS
- This is a rapid-fire drill—be quick, one ball can be in the air while the other is returned to the feeder
- Three or more players can perform this drill every day before or after practice
- Use all sets in this drill; don’t neglect the right-side sets
e. VARIATIONS
- The toss can come from various positions on and off the court.
- Make the setter jump-set all balls.
- Have the setter start at various positions away from and along the net
- Make the setter move to the ball to replicate a pass off the net
Intermediate/Advanced
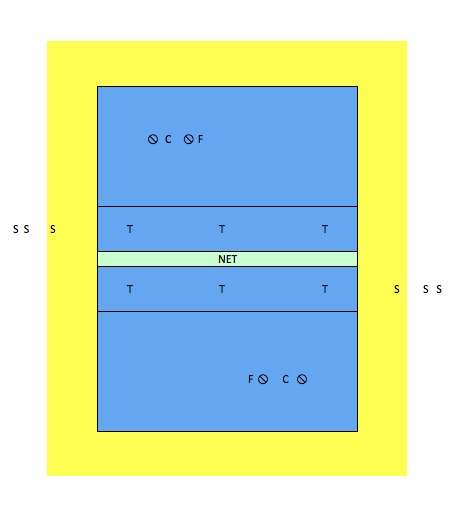
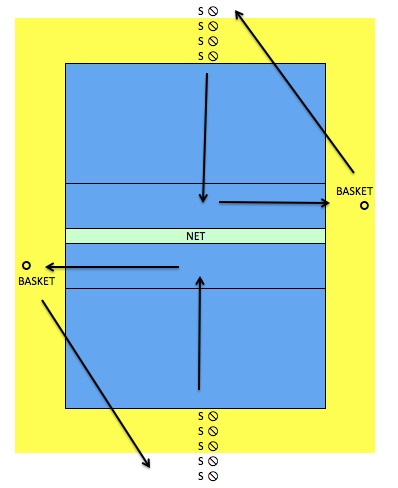
Zone 3 Spin-And-Set Drill
a. PURPOSE
This drill works the player’s movement and court orientation, along with accuracy.
b. SET UP
- Divide your team in half, forming a line on each end line, starting in zone 6
- Each player has a volleyball
- Portable basketball net, or other catching target if necessary, set up in free zone at the net
c. RUN THE DRILL
- Have player at the front of each line toss the ball to themselves, then hit a high set to land in zone 3
- Player runs to zone 3 as well after set
- Player lets ball bounce on floor, gets underneath ball, and sets to themselves again
- As ball comes back down, player sets ball again to score basket in basketball net (or other catching target)
- Player retrieves ball and goes to back of line.
- Do three rounds, keep score – 2 points for basket, one for hitting rim or backboard
d. COACHING POINTS
- Emphasis on good setting form
- Anticipate where ball will land, move accordingly
- Proper body position when going from end line to frontcourt, then turning in frontcourt to face basket
e. VARIATIONS
- Have a basket on either sideline, coach calls out left or right basket
- Have player do a 360 degree spin
- Build in passing rather than setting from backcourt position in order to get practice at both passing and setting
PASSING DRILLS
As passing is used more frequently than any other skill in a game of volleyball, it is key that your players are comfortable passing in any situation, and are also comfortable with both the forearm and overhead passing techniques.
The key to a good pass always starts with correct form, which is as follows:
- Knees bent
- Legs a little more than shoulder-width apart
- Right foot slightly forward
Just as it is beneficial to have a grading system when it comes to serving drills, the same applies to these volleyball drills.
A good system to use when passing to a setter, for example, is numerical: 3, 2, 1, 0
- 3-A pass that is graded as a 3 is the best there is. Not only is the pass accurate, but it also gives a setter three hitters to set to at the net
- 2-A pass that is graded as a 2 is still good but not quite what we want. The pass is not quite as accurate, making the setter have to move a bit to get to the ball, and giving the player two hitters to set to at the net
- 1-A pass that is graded as a 1 forces the setter to move quite a bit to set the ball, resulting in just one hitter to set to
- 0-A pass that is graded as 0 means game-over, as there is no hitter to set to
Not only will this system ensure that your players know what is required from them and what constitutes a good pass, but it also acts as a fun way and excellent motivational tool to improve their passing.
As a coach you can record each player’s score, introducing a fun competitive element, and even reward the winning player at the end of the practice session for a job well done.
Feel free to tailor this grading system as you see fit depending on which aspects of passing and ball handling skills you want your players to improve.
Beginners
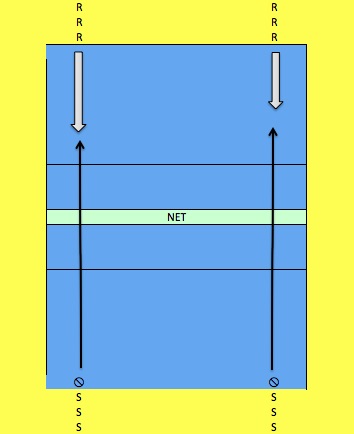
Serve Receive Drill
a. PURPOSE
This drill supports being in proper anticipation and movement to receive a serve.
b. SET UP
- Arrange half your team on each side of the net, at the end lines, servers on one side of the court at the service line, and receivers (or passers) on the other side
- Ensure each server line has a volleyball
c. RUN THE DRILL
- The servers attempt to serve as short as possible, without making an error into the net
- When serve is contacted, the receiving players on the opposite side of the net (the passers) run and try to catch the ball before it hits the ground
- The passer gets 1 point for every ball that does not land (i.e. catching it)
- The passer rolls the ball back to the server line under the net, and then goes back to the end of the passer line
- Servers rotate as well
- Repeat for a set amount of time, 2-3 minutes, and then switch roles. Player with the most points is declared the “winner”
d. COACHING POINTS
- Checking to see that the passers are waiting until the ball is contacted before moving
- Encourage the passers to anticipate where the ball will go
e. VARIATIONS
- Add a target and have the passers attempt to forearm pass the ball to the target (such as a pylon or taped box on the floor)
- Passers stay until they get a set number of passes to the target
- Have two passers per server behind the end line and let the servers serve rapid fire, count to three or five between serves
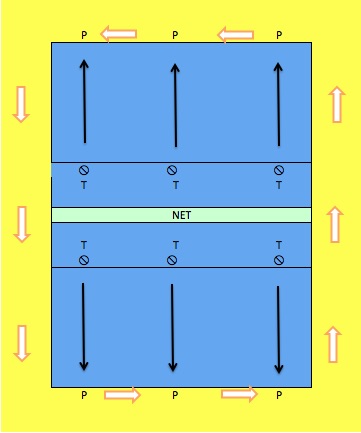
Transition Passing Drill
a. PURPOSE
This is designed to improve agility when passing, and quick transition in beating the ball to where it would land.
b. SET UP
- 3 tossers set up at the net on each side with a ball, facing the end line
- 3 passers set up on each side of the net on the end line, facing the tossers
c. RUN THE DRILL
- Tossers toss the ball in front of the passers
- Passers pass the ball back to the tosser, and then move to the right
- Tossers toss the ball again to the next player opposite them and the cycle repeats
- Once a passer gets to the sideline, the passer passes the ball and then runs to the opposite court
- Repeat cycle four times, then switch passer and tosser positions
d. COACHING POINTS
- Make sure passers move their feet to the ball. They will have a tendency to pass and move at the same time
- Emphasize that the first step is most critical when transitioning. For a quick transition, players must push forward off the back foot to get to the ball
e. VARIATIONS
- Have passers move to the left (clockwise), coach to call or whistle direction change
- Have passers start at the attack line, move to the end line to pass a deep tossed ball
Intermediate/Advanced
Active Passing Drill
a. PURPOSE
This is a 3-player drill that works for accuracy, footwork, anticipation and reaction to the ball, and fitness.
b. SET UP
- Arrange players in groups of three, with one volleyball per group
- Ensure that there is enough space around the gymnasium / court to provide for movement
- Have each group of three players separate about 10 feet apart, 2 players on one side and 1 player on the other side.
- Volleyball starts where the 2 players are located
c. RUN THE DRILL
- This is a drill that cycles players within the group of 3
- First player tosses ball to other player opposite them (i.e. the second player)
- Opposite second player uses forearm pass to deliver ball back to third player
- Third player (standing in place from where the ball was originally tossed) receives ball and forearm passes to original tosser, who has jogged over to where the second player was
- Original tosser then does first forearm pass, to the player who received the original toss
- Cycle continues
d. COACHING POINTS
- Accuracy and control are key emphasis points
- Ensure proper passing form is present in setting up to receive
e. VARIATIONS
- Have a competition between groups – which one can have the most consecutive passes?
- Begin with high passes, then get increasing lower (as shown in video with three “tempos”)
BLOCKING DRILLS
In volleyball, blocking is considered to be the first line of defense and digging the second line of defense. However, this doesn’t mean that one is more important than the other, so improving both of these skills are paramount to a good defense.
When it comes to blocking a lot is required from a player:
- Closely watch the pass
- Assess where it is going along with accurately judging its trajectory
- Locate the hitter
- Move into position
- Block and time the jump well (timing is generally considered as the most important aspect)
Due to a lot being required of a player to make a good block, it is best to guide players through several steps when it comes to blocking drills.
These steps may include blocking with and without a ball, getting into the correct position with and without a ball, and finally putting it altogether.
Beginners
Block Grab Drill
a. PURPOSE
This is one of the best volleyball drills for setting up proper takeoff, coordinating hand position with eyes on the ball, and strengthening.
b. SET UP
- 3 groups of two players, each with a ball, on one side of the net (either or chairs or standing depending upon height, in front row player positions)
- Players hold balls at top of net
- 3 front court players (blockers) on opposite side of net
c. RUN THE DRILL
- Blockers shuffle side to side, jump to “block”, but grab ball and land, then jump back up to give ball back to original player immediately
- Left or right side front court player mimics dig stance when block/grab occurs on farthest side
d. COACHING POINTS
- Watch for proper takeoff stance
- Block/grab cannot lead to touching net, or feet going over floor mid-line.
e. VARIATIONS
- Coach can call out direction left or right
Swing Blocking Drill
a. PURPOSE
The swing block is an excellent means of propelling a player upward. While especially important for the middle front row player (zone 3), other front row players will find this useful as well
b. SET UP
- 1 front row player on each side of the net, close to sideline (i.e. zone 4 for one player, zone 2 for player opposite side of net)
- Remainder of players on sideline to rotate in
c. RUN THE DRILL
- Starting players move to zone three, emphasizing downward swing of arms with foot and body movement
- Each player jumps bringing arms up in blocking motion – players on each side of net touch hands
- After first players touch hands, players next in line step into respective starting zones (again emphasizing downward swing of arms with foot and body movement)
- As players move across and finish, players run to opposite court to practice takeoffs from other side
d. COACHING POINTS
- While speed of movement to block setup is key, emphasize fundamentals first
e. VARIATIONS
- Have swing blockers only on one side of the net, with players on chairs holding volleyballs above the net on the other side
- Swing blockers jump up to touch ball
Intermediate/Advanced
Blind Blocking

a. PURPOSE
This teaches the blocker how to read the hitter, get into the correct position, and block the attack.
b. SET UP
- Three hitters set up at the net on one side
- Three blockers set up at the net on other side
- Three tossers set up behind the attack line on the blocker’s side
- Each has a cart of balls
c. RUN THE DRILL
- The tossers throws the ball over the net to the hitters on the other side, hitter attacks ball
- The blockers read the hitters and adjust to block them
- Once the three blockers have achieved 10 successful blocks, players rotate positions (i.e. tosser to blocker, blocker to hitter, hitter to tosser)
- Repeat the sequence until every player has made 10 blocks
d. COACHING POINTS
- Stress that the blockers must keep their eyes on the hitter, not the ball
- Make sure the blocker starts in a blocker’s ready position and moves in the most efficient manner possible
e. VARIATIONS
- Have the tosser move the hitter around so that the blocker must move in order to be properly positioned (be careful of space in relation to other drill lines)
DIGGING DRILLS
As mentioned, digging is the second line of defense but equally as important. Digging may perhaps be the drill where more repetitions are required than any other skill in volleyball, but we’ve got you covered with several volleyball drills varieties below.
There are several things that must be taken into account when running through digging drills from a player’s perspective:
- Get into a low position with your legs spread wide
- Distribute weight evenly
- Beware of court boundaries
- Keep the ball in front of the body, pushing under it
Beginners
Knock-Out Digging Drill
a. PURPOSE
This fun drill has players engage in friendly competition, with point rewards for the best digs.
b. SET UP
- This drill can be done with any number of players
- Place tape or rope within the attack zone area of the court to signify “boxes”, a small box and a larger box
- Players lines up in side line
- Coach in zone 2, hits the ball to player at front of line’
- Player digs the ball, and tries to direct it to one of the boxes to catch it
c. RUN THE DRILL
- The goal is to dig a ball into a target area with enough height to catch it
- The best dig is one that the player catches in the small box (3 points), then the second best dig is caught in the bigger box (2 points)
- Third best is catching it anywhere on the court (1 point)
- And the least desirable dig is not catching it at all
d. COACHING POINTS
- Key is to control the digs in a way that allows the setter to make a good set.
- Any dig that stops the ball from hitting the floor is good, but accuracy is good as well
e. VARIATIONS
- After a certain number of rounds, top half of players with the most points goes to second round and so on until team dig champion is declared
- Have two boxes on either side of court and call out dig direction before hand
- Run the drill as a “knockout” (shown in video)
Digging By Yourself Drill
https://www.youtube.com/watch?v=B1_6LYsTZqQ
a. PURPOSE
This individual drill allows the player to work at their own pace, and set a level of difficulty for themselves to which they can respond more quickly (thereby enhancing reaction time).
b. SET UP
- Players around the outside of the gymnasium, facing empty wall space
- Each player has a ball
c. RUN THE DRILL
- Have each player toss or hit the ball against the wall above net height
- Player immediately prepares for dig as ball hits the wall and comes back to player
- Player then digs ball against the wall, then catches it
- Repeat 10 times at a higher height, then 10 times at a medium height, then 10 times at a lower height
d. COACHING POINTS
- Varying the height of the hit against the wall, and the speed of the hit, can challenges players in different ways allowing for individual coaching support
- Can be used for underhand digging or overhead
e. VARIATIONS
- 2 players can do the drill, one hitting and one digging with the hitter varying the angle of hit against the way (forcing the digger to move laterally as well as forward or backward)
Intermediate/Advanced
Dig A Dozen Drill

a. PURPOSE
This drill prepares players to dig down-the-line attacks and crosscourt attacks repeatedly.
b. SET UP
- Two coaches set up at midcourt on one side with a cart of balls and a feeder
- A group of diggers lines up near each corner of the court on other side of net
- A group of attackers lines up near the net on coaches’ side of the net
- One setter for each group of attackers
- Two target players on diggers’ side of the net
c. RUN THE DRILL
- Each coach tosses a ball to his or her setter, who sets the first hitter from his or her line. The attacker hits only down the line, or crosscourt (coach to call out)
- Defenders dig balls to the assigned target then move to the end of the line
- Targets catch the balls and roll them to the feeders on the opposite side of the net
- Each group of diggers performs 12 digs, which is one round
- After the first round, defenders and attackers can switch positions and repeat, or the same hitting groups can hit a different angle
d. COACHING POINTS
- If hitters cannot control the attack well enough to keep the ball on the designated half of the court, have only one group of hitters and defenders working on each side of the net
- Designate someone to count the digs
e. VARIATIONS
- Have the target become a setter, place a player in a hitter position on each sideline on the diggers’ side to catch the set ball (the catcher then returns ball to feeder)
HITTING DRILLS
There may not be a better sight and sound in volleyball than watching your team powerfully hit an unreturnable ball over the height with a thunderous boom to win the point. The players who hits the ball that wins the point tends to get all the glory, so it shouldn’t be too hard to motivate your players to become motivated with these volleyball drills. However, having said that, keep in mind that players who play in positions that aren’t often involved in scoring don’t feel demotivated either.
Due to the fact that hitting tends to be more complex than it looks, volleyball drills should be broken down into parts, using several drills to improve each part per session until finally all parts are put together.
A good hitter must:
- Have good shoulder position
- Explosively jump high behind the ball from one or both feet
- Use a fast arm swing
- Follow through
- Land safely on both feet
Related Article: How To Spike A Volleyball Straight Down
Beginners
Platform Hitting Drill

a. PURPOSE
This drill has the player standing on a platform / large box in an attacking zone on the court. The player can focus just on the swing and hit to begin, not having to worry about the approach and footwork to start. The player also sees the benefit of hitting the ball at a good height above the net.
b. SET UP
- 2 platforms / large boxes, such as stage risers, are placed in zone 4 on each side of the net
- Player stands on box, facing net at an inward angle
- Coach and feeder a short distance away from the platform
- Target players on opposite side of net to catch balls and return to feeder
c. RUN THE DRILL
- Coach tosses easy ball to good height above net
- Player hits ball to opposite side
- Player has 10 hits, then next player goes onto box
- Once players have cycled through, move platforms to other sideline (i.e. zone 2) and repeat
d. COACHING POINTS
- Players focus only on good contact with the ball, hitting the ball over the net into opposite court within lines
e. VARIATIONS
- Coach may call out zones for players to hit ball
Progressive Hitting Drill
a. PURPOSE
This drill has the coach set the height of the toss to the hitter (and therefore the pace). Hitters can work on their approach mechanics as well as their timing in meeting the ball well above the net height.
b. SET UP
- Line of hitters in a designated position (in the video, from the left front)
- Coach close to the net in middle of court, feeder behind coach with basket of balls
- Players as targets / retrievers to return balls to feeder
c. RUN THE DRILL
- Coach begins tossing consistent short height balls in rapid succession
- Line of hitters cycles through hitting
- After a few rounds through the line, coach starts to move further away from hitting line, tossing higher
- Players adjust approach speed and timing of jump to hit ball
d. COACHING POINTS
- Players will get into a rhythm at the consistent height for easy repetition
- Emphasize approach footwork and swing
- Players to hit ball at highest point they can above net
e. VARIATIONS
- Coach may call out zones to which to hit – vary the zone per cycle of players, or for each player individually
Intermediate/Advanced
Quick Angle Attack Drill

a. PURPOSE
The quick angle attack is effective in keeping defences off-guard. This drill practices hitting angles, with intent from a middle quick attack.
b. SET UP
- A coach or tosser with a supply of balls sets up on one side in zone 6
- Feeders on either side of coach, zones 1 and 5
- Line of middle hitters in zone 3, and a setter in zone 2
- Defensive players set up on other side, zones 1 and 5
c. RUN THE DRILL
- The coach tosses the ball to the setter
- The setter sets a quick set to the middle hitter
- The hitter hits crosscourt toward target players, then goes to the end of the line and the next hitter takes a turn.
- Target players roll balls to feeders
- Hitters must alternate angles, attacking to the left and then to the right
- The setter should encourage these angles by setting the ball on (straight up) or off (slightly past the hitter, forcing the hitter to turn in the air and hit crosscourt)
- One round consists of 12 tosses, four attacks per hitter
d. COACHING POINTS
- During the drill, have hitters practice repetitions of each angle before alternating swings to each angle
- Make sure the setter understands the job of helping the hitter make the angles by properly placing the set
e. VARIATIONS
- Add a passer – coach tosses the ball to the passer, who in turn passes to the setter
- Add defensive front row players on target side to simulate blocking
- Instead of alternating left and right angles, let the setter and hitter determine the angles
CONDITIONING DRILLS
While players should work on conditioning at home , it is also important that conditioning is worked on in team practices via volleyball drills.
The importance of conditioning shouldn’t be overlooked, as it can often be the difference between a win and a loss, particularly if the game goes on for a long time and is tight. In situations like these the physically fitter team more often than not wins.
Don’t forget that conditioning also plays a vital role in improving important attributes like quickness and vertical jumping, which are of course important in and of themselves as a volleyball player.
Beginners
Off the Floor Drill
a. PURPOSE
This is a good drill to teaching players to get up off the floor quickly to make a play when they have gone to the floor on a block or dig (for example). It emphasizes quickness, reaction time, and conditioning if repeated in cycle
b. SET UP
- Have the players form a line at the end of the court
- The first player in line starts by getting down on their stomach
- Coach is in middle of court, with feeder
c. RUN THE DRILL
- On the coaches signal (whistle or callout), the player gets up quickly off the ground
- Coach tosses a ball into the front row in some position
- The player gets into passing position and makes a pass to a set target player
- While first player is making set, the next player in line gets down on their stomach to await the whistle / call
- Run through the line for 5 minute intervals, 1 minute rest in between, for 5 cycles
d. COACHING POINTS
- Put emphasis on quickness getting up, locating the ball in the air, and setting up under ball to make set
e. VARIATIONS
- The toss can be easy so the player can learn to get into good position to pass after quickly getting up off the floor
- As part of progression, the toss can be away from the player so then they must move or dive to get the ball up
Off the Floor Fours Drill
a. PURPOSE
The is a competitive continuation of the above “Off The Floor” drill, it continues to enhance the same points but adds fun competition into the drill by having 2 teams of 2 players oppose each other
b. SET UP
- Divide team into halves, one half on each end line
- Each half on the end line further divides into two lines
- Coach on side line at net
c. RUN THE DRILL
- Like the Off The Floor Drill, players at the front of each line start on their stomachs
- On the whistle / coach’s call, all 4 players get up and run toward the net
- Coach tosses ball in to one side randomly
- The players on each side of the net are teams of 2 trying to score a point
d. COACHING POINTS
- As above, quickness in getting up and getting to the ball is key
- All skills can come into play – hitting, setting, passing, transition
e. VARIATIONS
- Depending on skills and fitness needs, coach may call only sets or passes, or may state that the ball needs to cross the net 4 times before a point can be scored
- Winner can stay on the court
Intermediate/Advanced
Speed & Agility Drills
a. PURPOSE
Foot speed, agility, and stance are key components in any volleyball situation. The time spent in these individual drills, especially maintaining stance, will help to build endurance as well as quickness. This is one of the best volleyball drills for that.
b. SET UP
- Rope ladder set up on floor
- 4 pylons set up in box formation, as many boxes as you need
- Half of team at rope ladder, half at pylon box formation
c. RUN THE DRILL(S)
ROPE LADDER
- Have the players start with both feet in a space between the “rungs” of the ladder
- Players run on the spot as quickly as they can, altering their steps within the ladder, then in front of the ladder, then behind, and so on
PYLON BOX
- Players begin at pylon closest to them, shuffle diagonally to far corner pylon, then laterally across top of pylon box to other corner, the diagonally back to final pylon
- After players have cycle through one station, rotate to other drill
d. COACHING POINTS
- Foot speed and stance are key, especially when players are starting to fatigue
e. VARIATIONS
- Depending on your team’s fitness levels, time and intensity can be varied
- Progression of time and intensity can be built over length of season
TEAM BUILDING DRILLS
We have already listed numerous volleyball drills that include the whole team in improving their skills, but this isn’t what we mean by team drills in this section.
As volleyball is a team game where teamwork is of vital importance if you want to stand any chance of scoring a point let alone winning a match, it is vital that a positive environment is created and nurtured where the importance is on bonding and team spirit. This doesn’t just apply to a player-player relationship, but also to a player-coach relationship.
Remember, if players didn’t want to form some sort of bond then they would have chosen an individual sport rather than volleyball, which is generally considered as a sport that requires the most team work to be successful than all other sports.
Beginners
The Conveyor Drill
a. PURPOSE
This fun group activity focuses on team coordination and decision making to maximize the talents of all.
b. SET UP
- Arrange your team in groups of 7 or 8 (larger groups are fine, but do not go less than 7)
- All groups line up on one sideline, with all but 1 members of the team lying on their stomachs and shoulders touching
- The final member of the team lies on their back on top of the other group members, perpendicular to them
c. RUN THE DRILL
- The object is to convey the group members lying on their stomach to convey their teammate on top of them to the other sideline by coordinated rolling
- As the group rolls, the teammate on top moves
- The last position person rolling runs to the front of the rolling group once the teammate being conveyed is not in contact with them, in order to continue the forward conveying
- First group to get all members across the far sideline is the winner
d. COACHING POINTS
- Groups must strategize in choosing who is conveyed, and who are the rollers (lightest person? tallest person?)
- Teammate being conveyed is not to touch the floor, must do their best to remain rigid
- Coordination of rolling is key
e. VARIATIONS
- Other objects can be conveyed (example – foam pool noodles, bag of volleyballs, etc.)
- If teammate or object being conveyed touches floor, have to start over again
- Put obstacles in pathway (such as a pylon or a mat); if team touches the obstacle they get ‘frozen” for 15 seconds
9 Feet, 3 Hands Drill
a. PURPOSE
This drill engages players to problem solve in a variety of ways – there is more than one solution, so the team can think about the best way to meet the goal. In addition to fun team building, natural leaders will rise to the occasion.
b. SET UP
- Depending on the size of your team, you can divide into groups or have just one group
- Start at the end line, team(s) must all move together to the attack line or net
- While this drill is 9 Feet 3 Hands, you can alter the numbers to fit your team – the key is to have odd numbers for the feet and hands
c. RUN THE DRILL
- The object is to have the entire team or group move as one unit, but only using 9 feet and 3 hands touching the floor.
- Teams must problem solve first – who will walk, who will carry or be carried, whose hands will be on the floor, overall shape of group
- Once the team has set, coach blows the whistle to start the group
- Group must move as a unit to the attack line or net as quickly as possible while maintaining unit cohesiveness
d. COACHING POINTS
- Know your players, some will be stronger than others so ensure that the team makes good decisions
- Team cohesiveness is a factor first, then team speed
e. VARIATIONS
- Have groups race each other
- Arrange groups, start a timer, then give the challenge to the groups to see who problems solves and executes the task fastest
- If group loses cohesiveness, start over at end line
Intermediate/Advanced
Blindfold Matrix Dill
a. PURPOSE
This exercise is designed to get your team out of the gym, although it certainly could take place in the gym as well. Not only is this exercise fun, it does emphasize listening skills, clear communication, and trust between teammates.
b. SET UP
- In a defined area, set up low obstacles in a “course” that a blindfolded player (or group of players) has to traverse
- Obstacles should be soft (foam, pylons, etc.) so that if stepped on, chances of injury are minimized
- Divide your team in to groups of 4 or 5 – number of blindfolded players can vary
c. RUN THE DRILL
- The object is to have the non-blindfolded players give verbal instructions as the blindfolded players navigating the obstacle course
- Instructions can include number of steps forward or backward, left, right, step over, etc.
d. COACHING POINTS
- While this is a fun drill, safety is key as well; ensure that players stay within the defined area
- Clarity and brevity of communication is key, as is listening
- If multiple players are blindfolded, various instruction can occur (example in a group of three, label the players A, B and C so that each knows as instruction is directed)
e. VARIATIONS
- Have blindfolded players also carry out tasks (for instance, place a tennis ball in a cup, find and blow up a balloon, write their name on a piece of paper, etc.)
- Have multiple players giving only certain directions each (for instance, one player can only say “forward” while another can only say “backward”) to foster communication coordination
Check Out these 2 resources for more drills
See Also:
- Best Volleyball Shoes
- Best Volleyball Ankle Braces
- Best Volleyball Knee Pads
- Best Volleyball Nets
- Volleyball Positions, Roles + Formations (Easy to Understand Guide)
- The Best Volleyball Cheers & Chants (For all Situations)
- Volleyball Quotes (By The Greatest Players + Coaches
- Volleyball Rules + Regulations (Easy to Understand)